This year, Yomi's Gate was nominated in the South by Southwest Gaming Awards. I'll be showcasing the game at the festival from March 13th through March 15th 2015. Between now and then, I'll be writing a series of articles discussing the game, where it came from, how it was made, and the kinds of challenges I've encountered along the way. This is one of those articles.
Week One: Why Yomi's Gate? - An article about why I'm making this game and not something else.
Week Two: The Shape of Things - Insights into how I go about creating pieces for Yomi's Gate.
This week I'm going to talk about the map in Yomi's Gate and how I went about creating the modular boards.
One of the earliest goals I had with Yomi's Gate was that it should have a high degree of replayability. Without any randomness in player actions, I knew game to game variance would probably have to come from the map itself. One of the easiest ways to make that happen is modular terrain.
I started by doing my homework on how other games handled it. My friends at Cardboard Fortress are making their game, Kobolds, with perfect squares. You make the map by putting squares together, each of which divides into its own clean, 3x3 grid. This keeps the game interesting, but the map regularity isn't the same for hexagonal grids.
The closest solutions I could find for hex grids were actually on the forums for Ogre, the enormous strategy game by Steve Jackson Games. People who play Ogre want the same thing I want with my own game: A new map every time they play. They did some work into different ways you might be able to regularly break down a hex grid, but their ultimate goal was filling the rectangular map space for a standard Ogre board, so it only took me so far in figuring out what might work for me.
In order to more generally get my head around the kind of patterning I had in mind, I actually started a wiki walk from the Wikipedia page for tessellation. The loose concepts regarding tessellation in general combined with the functional goals of the players on the Ogre forum were enough to get me started drawing out some ideas that could work.
Luckily, I have this amazing art program called Hexels that lets you paint on a hexagon grid. I previously used it to make the art for my Ludum Dare 27 entry, Hexlaser, so I'm reasonably comfortable with the interface. Hexels also makes everything look fantastic, so it makes brainstorming sessions seem kind of brilliant no matter how good or bad they are.
Here's the final canvas from my tile brainstorming session:
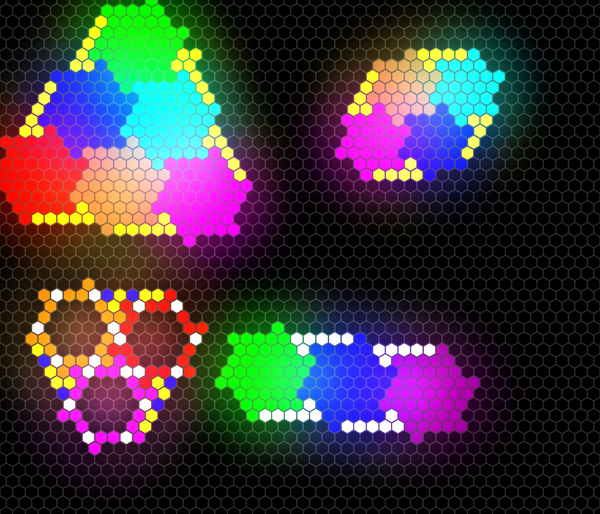
It looks a bit of a mess, but there are just a few things going on.
- I started with a single hexagon, then made a uniform border around it to make it bigger. These are called "prototiles" because they're the primary repeating shape that forms the pattern. I tried a few sizes that were small enough to change in interesting ways game by game but big enough that piecing the board together wouldn't be tedious.
- One of the problems here is that if you flip a uniform prototile upside down, it still fits with other tiles. I wanted assembling the board to be foolproof, so I added an extra hexagon to the tip of each edge. This maintains rotational symmetry, but removes reflective symmetry. With that change, you can only assemble the boards face-up. This matters a lot less when the boards are opaque and terrain is only on one side, but with clear boards it was important.
- With the extra hex, board had some awkward rough edges to them. This could create some unnatural choke points during actual gameplay, so I simply filled in the edge with another color to represent a filler tile. It turns out that this filler tile works at all sizes and all rotations, which is super cool.
- Finally, the bottom-left image is the setup I used to determine where I needed to add tabs. It wasn't enough to have a sturdy board; I wanted a board that would stay together during gameplay instead of falling apart the first time the table got bumped. The white hexes were where I thought I might need tabs. It worked in concept, but I actually made teeny tiny prototype prototiles and marked them with an x-acto knife just to be certain.
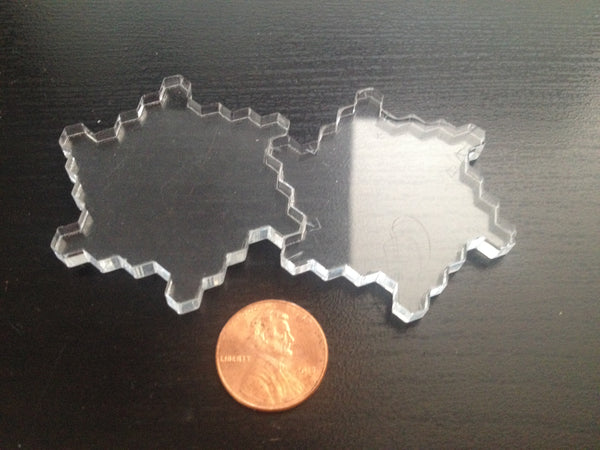
Everything seemed to work, so after that it was just a tedious process of going tile by tile and making the map in Illustrator, then cutting it out. I tried wood and I tried thin acrylic, but wood splintered and thin acrylic warped, so thick acrylic was the only way to go.
I wasn't sure what was going to work for terrain, so I didn't start out etching terrain onto the boards. I went to Staples and bought plain-colored stickers with green to represent forests and yellow to represent mountains. This way if some configuration of terrain was broken in some way, I could simply add, remove, or rearrange stickers.
People sometimes ask, "How did you decide where to put the terrain?" I started by assuming that about 20% of each board should be obstructive terrain, which in retrospect is kind of arbitrary but it seems to work so I decided to run with it. From that, I wanted approximately an even split between forests and mountains, I wanted to have some clustering instead of a totally random distribution, and I didn't want any two boards to be identical.
What this meant was that I did the first board somewhat randomly, abiding only by those simple rules, then I put it underneath the second board. Since boards are clear, I could see where I had already laid out terrain, so I could make the second board knowing it wouldn't be the same as the first. I repeated this for several boards, then through playtesting I learned where to remove or rearrange terrain. The maps still aren't perfect, but play is supposed to be a little asymmetrical so I think it works. As long as there isn't a map layout where one player is guaranteed to win, it's good.
After that, all I really had to do was agonize over actual terrain art. I did this for several days, throwing out many drafts before I finally said, "Eh, this works." Ultimately, there are two distinct terrain tiles, one using curves and round shapes and the other using sharp lines and triangular shapes; My only goal is that if I tell you one represents mountains and one represents forests, you can figure out which is which. So far, not a single person has gotten these confused, so I think that goal has been achieved. I'd love to revamp that art, but doing so is currently far down on my to-do list since the current art is functionally quite effective.

In case this is your first time seeing Yomi's Gate, here's what the game currently looks like, replete with engraved terrain.
Thanks for reading. Come back next week for another article about what it's been like to make Yomi's Gate!